This project is the University of North Florida's Osprey Robotics Club ROS implementation for their NASA Lunabotics Remote Mining Competition Robots, past, present, and future.
The following assumes you have installed all the necessary ROS 2 Iron packages, and have sourced the installation before running any ros2 commands.
source /opt/ros/iron/setup.bashYou may want to have your development user environment do this on login via ~/.bashrc file; add that command to the end of that file.
Its recommended to have a ros2 workspace in a user directory for development purposes, to build this project, etc; ex ~/ros2_ws/. The following will refer to that directory, and directories created within.
Download and unpack or clone this repositories contents into your ros2 workspace; ex ~/ros2_ws/src/osprey_ros.
Building is done using colcon which will invoke cmake and run the necessary commands. Run the following command in your ros2 workspace; ex ~/ros2_ws/.
colcon build --symlink-install --packages-select osprey_rosMake sure to run the following command after install and login. Run the following command in your ros2 workspace; ex ~/ros2_ws/.
source install/setup.bashYou may want to have your development user environment do this on login via ~/.bashrc file; add the following to the end of that file.
source ~/ros2_ws/install/setup.bashTwo docker development environments are available for portable development and simulation. This requires docker to be installed on either Linux or Windows; Windows is untested. Of the two options, most will use the second option, the first will primarily be used within this repository for CI. Instructions for usage is provide within each of the respective repositories readme.
The first environment is the docker-ros2-iron image, which contains the base headless environment and
minimum packages needed to build and run opsrey_ros package.
The first environment is the docker-ros2-iron-gz-rviz2 image, which uses and builds on the previous base image with packages for graphical simulation, gazebo and rviz2. This is the primary image most will want to use for simulation testing of the robot and/or sensors.
There are two ways to run osprey_ros, either on the actual robot hardware or using simulated robot hardware. Either will work in simulation, but one will only run on the robot itself, the simulation can be run in the docker images or any ROS 2 Iron environment.
To run on the actual hardware run the following command in your ros2 workspace;
ex ~/ros2_ws/.
# 2024 Robot
ros2 launch osprey_ros osprey_ros.launch.py year:=24

# 2022 Robot
ros2 launch osprey_ros osprey_ros.launch.pyTo run on simulated hardware run the following command in your ros2 workspace;
ex ~/ros2_ws/.
# 2024 Robot
ros2 launch osprey_ros osprey_ros.launch.py sim:=true year:=24

# 2022 Robot
ros2 launch osprey_ros osprey_ros.launch.py sim:=trueRviz2 is used to see what the robot sees, sensors, etc. To run the robot either physical, simulated, or via gazebo, start either, and then run the following command. The robot will not appear if you do not start osprey_ros first!
rviz2 -d src/osprey_ros/sim/robot.rvizGazebo is used to see what we see, how the robot operates in a simulated world, physical or simulated, start either, and then run the following command. This will launch a full instance of the robot, so do not run in addition to osprey_ros.
# 2024 Robot
ros2 launch osprey_ros ign_gazebo.launch.py year:=24

# 2022 Robot
ros2 launch osprey_ros ign_gazebo.launch.pySample Artemis Arena
# 2024 Robot
ros2 launch osprey_ros ign_gazebo.launch.py world:=artemis_arena year:=24

# 2022 Robot
ros2 launch osprey_ros ign_gazebo.launch.py world:=artemis_arenaThere are presently two ways to control the robot using teleop twist joy and keyboard
For remote operation over IP run the following commands on both systems prior to running ros launch files.
export ROS_MASTER_URI=<robot_ip>:12345
export ROS_IP=<robot_ip>Run the following command to invoke the teleop manual joy controller for the gamepad.
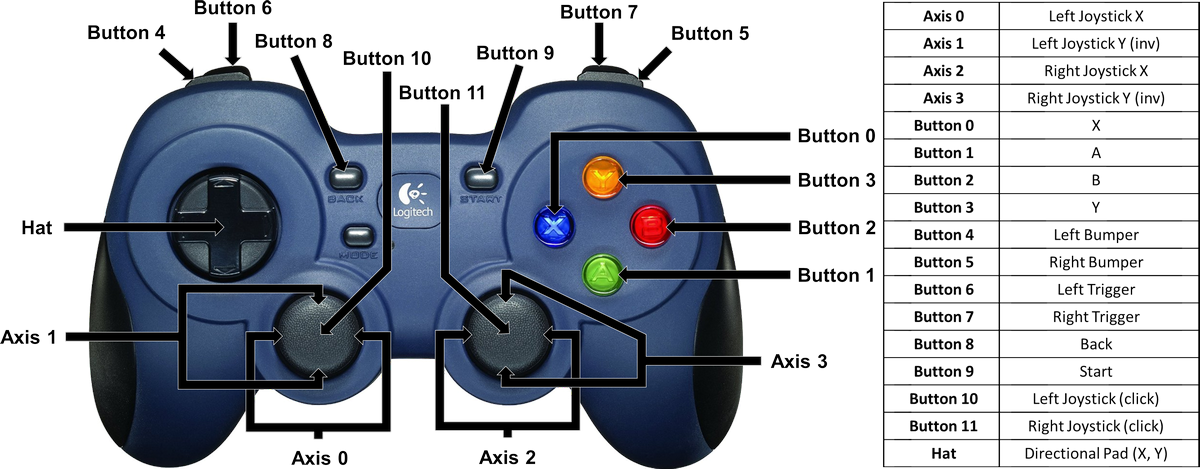
ros2 launch osprey_ros gamepad.launch.pyMovement is done using the D-Pad and the X and Right Trigger button combinations. Press either X or Right Trigger, and then use the D-Pad to move forward, backward, and turn left and right.
Run the following command to invoke the controller for the keyboard, which will present a interface for controlling the robot in the same terminal the command is run within.
ros2 run teleop_twist_keyboard teleop_twist_keyboardCredits and thanks for resources used in this repository, some code and/or project structure, go to the following:
- Articulated Robotics - Making a Mobile Robot with ROS
- ROS 2 Control Demos - example 2, example 10
- Slate Robotics - How to implement ros_control on a custom robot
- ICS - How to Control GPIO Hardware from C or C++